Level 3: Dedicated Hardware
Save Bitcoin using a dedicated offline device (as much as you'd be comfortable hiding under your mattress).
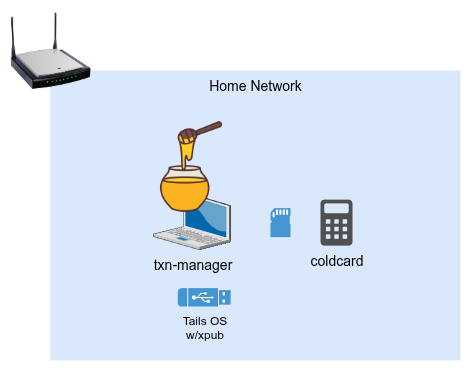
In order to save large amounts of money, and do so securely, you'll want to setup a dedicated signing device. Essentially, this will separate the private keys from the public keys.
Public keys will be managed in a transaction manager (used to verify addresses for receiving Bitcoin, checking balances, and created unsigned transactions). Private keys will be managed in an offline signing device (used only for spending Bitcoin).
While there are many alternatives -- we will use SeedSigner as an example, but any offline signing device can be used.
Beware of Hardware Wallets
A hardware wallet runs firmware written by someone else, on hardware built by someone else. You are trusting both the intentions and the competence of everyone involved in building and marketing (and even shipping) the device.
From 2021 to 2026 Coldcard (Coinkite) contained firmware with a broken random number generator. Seeds created on affected devices were weak enough that attackers could recreate them offline and drain wallets without physical access to any device (see Block's analysis). If the device that generated your seed was broken, a metal backup of that same seed does not save you. We do not recommend Coldcard.
Ledger's 2020 data breach leaked customer emails, names, phone numbers, and physical addresses. That kind of leak can and does lead to home invasions.
Use open-source, air-gapped, Bitcoin-only tools (SeedSigner is the example we use here). Generate entropy you can verify yourself (see dice).
Transaction Manager
A transaction manager can be any device, although it's recommended to use a dedicated laptop that you can install a Linux flavor such as Ubuntu. However, it is recommended to use Tails OS on a USB drive for the added privacy and security.
Honeypot
Your real transaction manager should be via Tails OS with a persistent xPub (see below). However, you may want to install Sparrow or Electrum with a hot wallet and use that for testing. This can also serve as a honeypot, that is, a Bitcoin wallet decoy. If someone comes looking for Bitcoin, a honeypot can act as an effective decoy.
Tails OS (xPub only)
Similar to level-2, we will use a bootable Tails OS USB drive for the actual transaction manager. To set up your transaction manager with a watch-only wallet, export the xPub (ZPUB) from your SeedSigner (Settings > Advanced > Export XPUB > Single Sig, native SegWit) and display it as a QR code. A full walkthrough is in the basic protocol.
Tails OS with xPub
- On your Tails OS, open Electrum or Sparrow.
- Create a new wallet, select
Standard wallet, and thenUse a master key(or import xPub/ZPUB). - Paste or scan the QR code of the xPub obtained from your SeedSigner.
- When you open this wallet, you'll see a warning indicating it is watch-only.
- When you attempt to send from this wallet, it will create an unsigned transaction (PSBT), which will need to be signed by the SeedSigner (see below).
Signing Device
SeedSigner signs over QR codes -- no USB cable between the signer and the networked world. For the full protocol, see basic protocol with SeedSigner.
Sign Transaction
- On the transaction manager, create a send transaction in the watch-only wallet and export the unsigned PSBT as a QR code.
- Power on the SeedSigner and load the seed if necessary (QR scan or manual entry).
- Scan the unsigned PSBT QR from the transaction manager.
- Review transaction details carefully on the SeedSigner display (destination address, amount, fee). Ensure the address you are sending funds to is absolutely correct.
- If the transaction information is correct and the fee acceptable, approve and sign. Otherwise abort.
- Display the signed PSBT as a QR code for the transaction manager to scan.
- Power off the SeedSigner when finished.
Broadcasting (signed) Transaction
- On the transaction manager, scan the signed PSBT QR from the SeedSigner.
- Open Electrum or Sparrow and load the signed transaction.
- Verify the transaction details again, ensuring the destination address and amount are correct.
- Broadcast the transaction to the Bitcoin network.
- Once broadcasted, confirm the transaction appears as expected.
Alternative Signing Devices
- SeedSigner: A DIY, open-source signing device built on affordable hardware (Raspberry Pi Zero). SeedSigner is air-gapped, supports QR code scanning for transaction signing, and is ideal for those who prefer a fully verifiable solution. See also the econoalchemist setup guide.
- DIY Raspberry Pi Zero: For advanced users, you can create your own signing device using a Raspberry Pi Zero with open-source software.
- Specter-DIY: This approach requires technical expertise but offers complete control over the hardware and software stack.
These alternatives prioritize open-source principles and Bitcoin-only functionality, aligning with the ethos of self-custody.
Hardware Wallets: Considerations
Hardware wallets can be part of a self-custody setup, but not all are created equal. See the warning above for Coldcard and Ledger specifically.
Prefer devices that are:
- Bitcoin-only (smaller attack surface).
- Air-gapped (QR preferred over USB).
- Open-source enough that firmware and seed generation can be audited.
- Able to use independent entropy (dice), not only the vendor RNG.
Other hardware wallets may:
- Support multiple cryptocurrencies, increasing complexity and attack surfaces.
- Rely on proprietary software or hardware, limiting transparency.
- Require online connections or companion apps, reducing security compared to air-gapped solutions.
- Collect your name and shipping address as part of the purchase.
When choosing a signing device, prioritize devices that are Bitcoin-focused, air-gapped, and open-source -- and always verify seeds and addresses yourself.